前后端交互
jwt (JSON web token)
简介
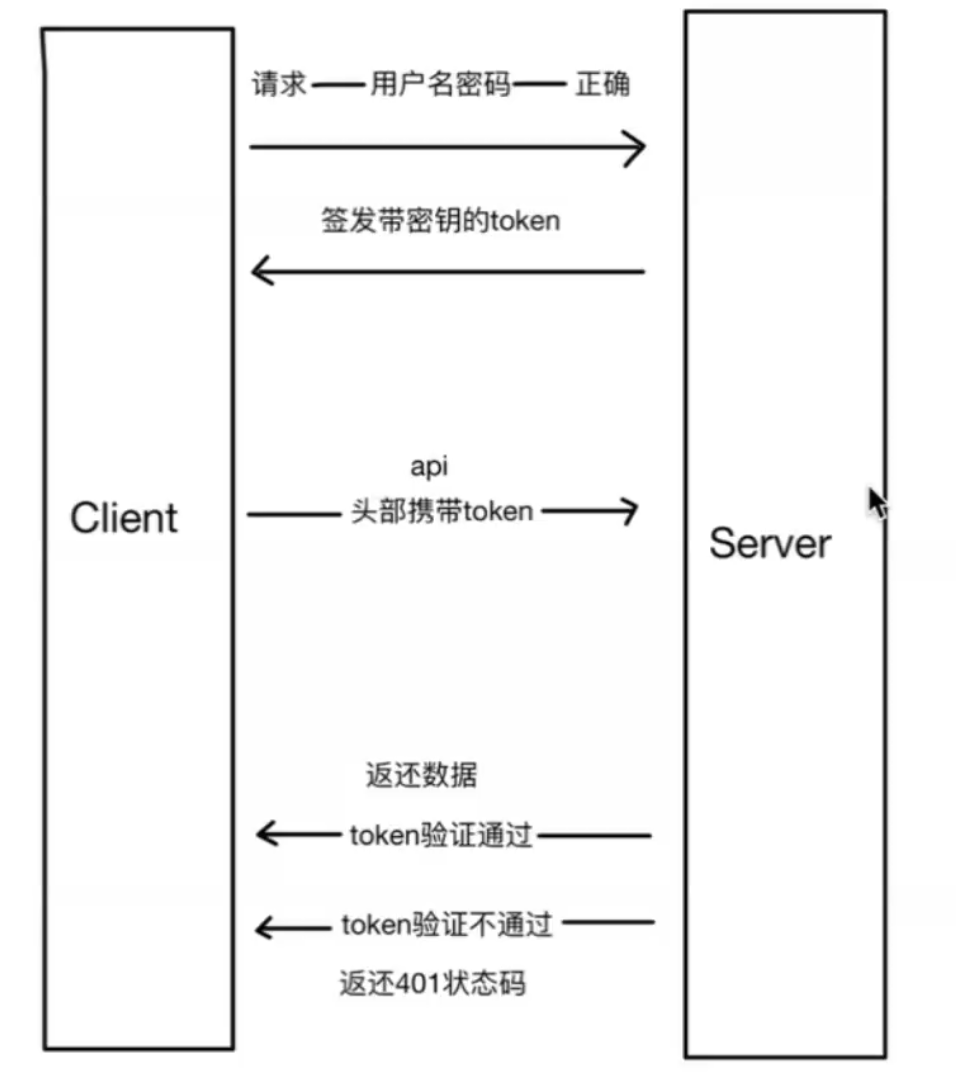
判断你是否有权限和服务器进行交互,相当于一个门禁吧,过程如下
知识点补充
token:服务端登录成功后进行签发
哈希:对复杂的数据进行摘要,10G 的内容,如果改了1kb ,那么它的哈希值也会改变的
实现方式
流程:我们以登录过程为例子,登录成功后签发 token,访问接口时携带 token
签发 Token
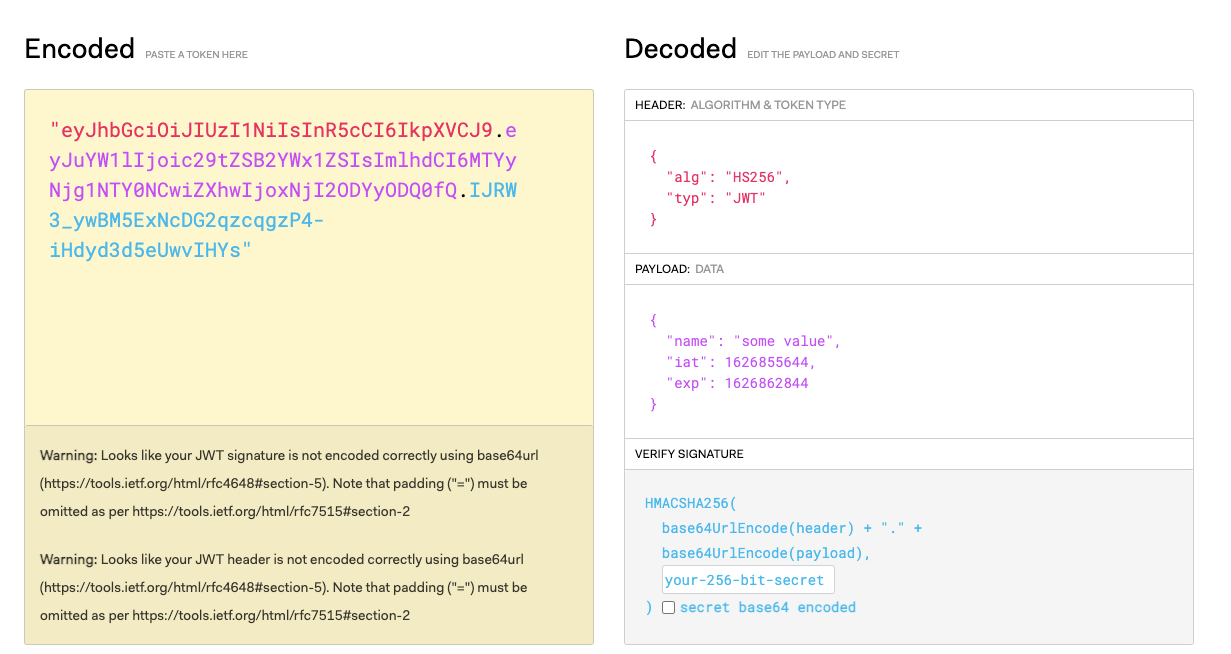
可以通过 jsonwebtoken 这个模块去签发 token,参考 npm 上的模块说明,也可以参考 https://jwt.io/ 查看 token 的信息
签发的过程如下
1
2
3
4
5
6
7
8
| const jwt = require("jsonwebtoken");
let token = jwt.sign(
{
name: "some value",
},
"mytoken",
{ expiresIn: "2h" }
);
|
后端签发好 token 后,发送给前端,前端需要保存好token,可以放到cookie 或者 localStorage 里(推荐放到localStorage)
鉴权
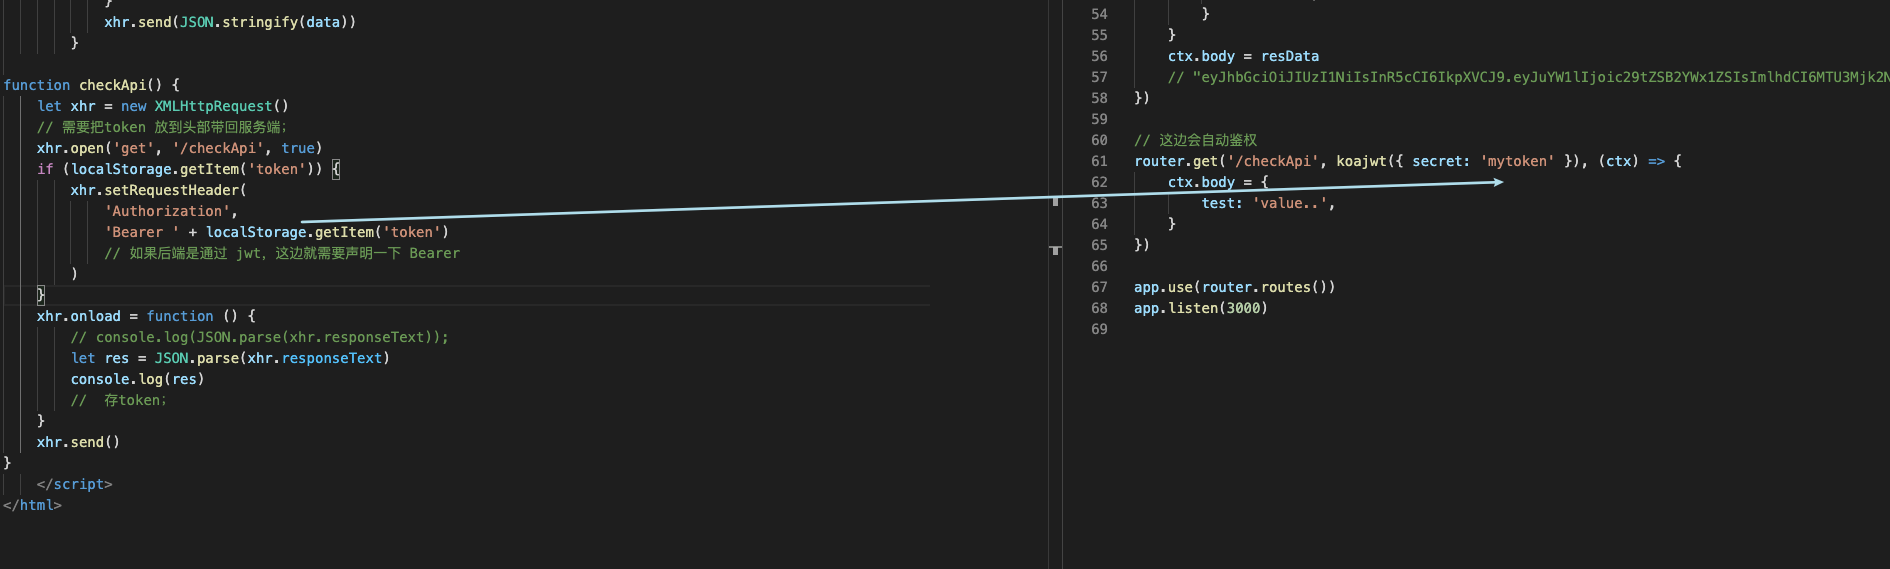
当前端去访问后台接口时,需要在请求头中带上你的 token,注意要声明一下 Bearer
1
2
3
4
5
6
7
8
9
10
11
12
13
14
15
16
17
18
19
20
|
function checkApi() {
let xhr = new XMLHttpRequest();
xhr.open("get", "/checkApi", true);
if (localStorage.getItem("token")) {
xhr.setRequestHeader(
"Authorization",
"Bearer " + localStorage.getItem("token")
);
}
xhr.onload = function () {
let res = JSON.parse(xhr.responseText);
console.log(res);
};
xhr.send();
}
|
携带好头信息后,后端接口可以这样校验,首先要引入 koajwt 这个模块,然后再写接口时,第二个参数写秘钥的名称:koajwt({ secret: 'secretKey' }),举例子的话就是以下这样
1
2
3
4
5
6
7
8
| const koajwt = require('koa-jwt')
router.get('/checkApi', koajwt({ secret: 'mytoken' }), (ctx) => {
ctx.body = {
test: 'value..',
}
})```
|
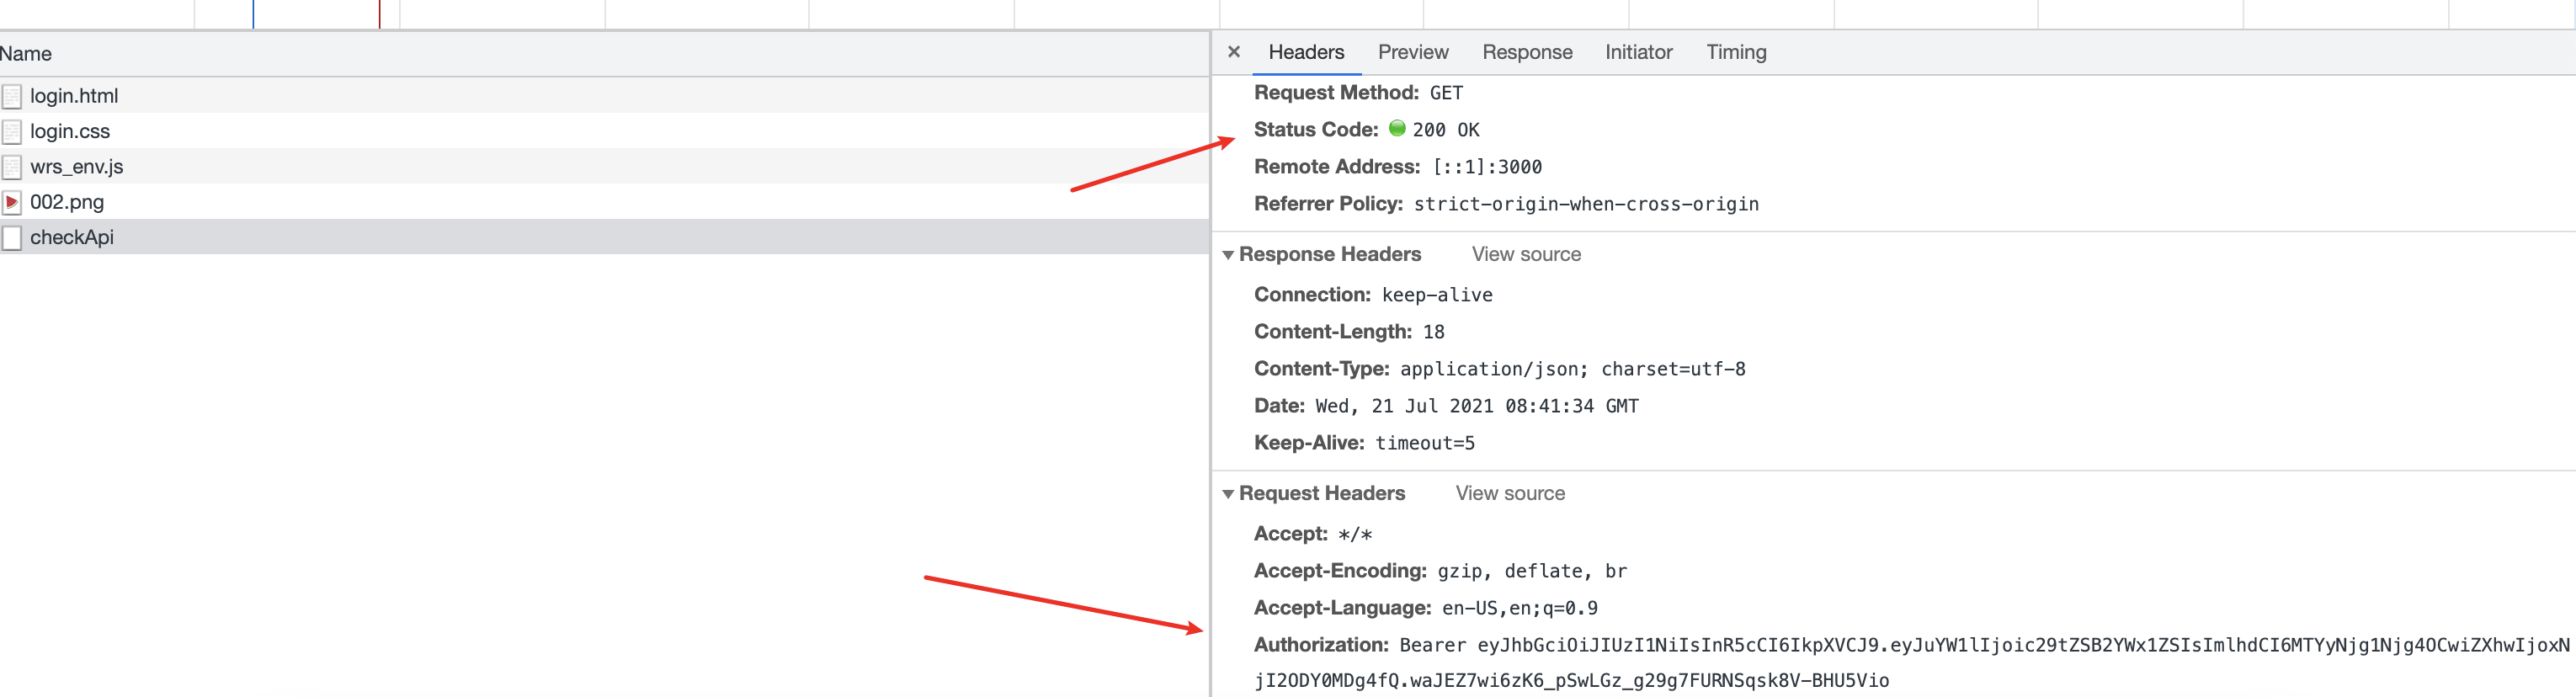
图片展示如下:
同源情况下,如果没有权限的话,会报 401 的权限错误,返回 Authentication Error 的报错信息
 非同源去检验权限的话报如下的错误,这里不是很明白,为什么
 token 错了会报这个错误呢?

成功的话就是正常的接口返回了
至此简单的 jwt 就结束了
请求工具
这里介绍几种方法,axios 以及 fetch,axios 比较常用
Axios
基础用法
axios 有两种常用的使用方法
第一种
1
2
3
4
5
6
7
8
9
10
11
12
13
14
| axios({
method: "post",
url: "http://localhost:4000/checkUser",
data: {
username: "张三",
password: "123",
},
headers: {},
}).then((res) => {
console.log(res);
if (res.data.token) {
localStorage.setItem("token", res.data.token);
}
});
|
第二种
1
2
3
4
5
6
7
| axios
.post("http://localhost:4000/checkApi", data, {
headers: {
Authorization: "Bearer " + localStorage.getItem("token"),
},
})
.then((res) => console.log(res));
|

网络拦截
回到刚才的问题上!
提出问题
如果有很多接口都需要验证 token ,那么我们不能在每个接口里都要写验证的语句,那样的话代码就会冗余
有什么办法统一处理这些呢?
就是用拦截器。
Axios 中的拦截器
在每一个 axios 请求的时候都会走拦截器
1
2
3
4
5
6
| axios.interceptors.request.use((config) => {
return config;
});
axios.interceptors.response.use((res) => {
return res;
});
|
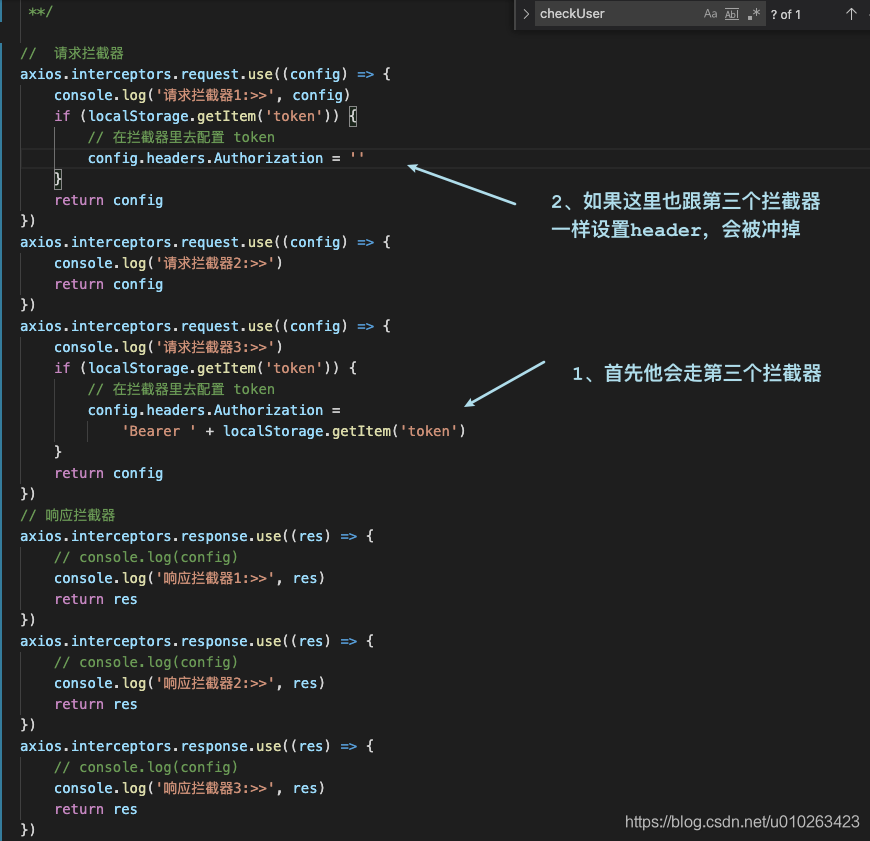
拦截器可以有多个,比方说下面的例子,我们在关心一下拦截器的顺序:
1
2
3
4
5
6
7
8
9
10
11
12
13
14
15
16
17
18
19
20
21
22
23
24
25
26
27
28
29
30
31
32
33
34
35
36
37
|
axios.interceptors.request.use((config) => {
console.log("请求拦截器1:>>", config);
if (localStorage.getItem("token")) {
config.headers.Authorization = "Bearer " + localStorage.getItem("token");
}
return config;
});
axios.interceptors.request.use((config) => {
console.log("请求拦截器2:>>");
return config;
});
axios.interceptors.request.use((config) => {
console.log("请求拦截器3:>>");
return config;
});
axios.interceptors.response.use((res) => {
console.log("响应拦截器1:>>", res);
return res;
});
axios.interceptors.response.use((res) => {
console.log("响应拦截器2:>>", res);
return res;
});
axios.interceptors.response.use((res) => {
console.log("响应拦截器3:>>", res);
return res;
});
|
打印的顺序如下图所示:

根据顺序可以分析出,配置能够被冲掉
简版 Axios
抽离出来了:https://blog.csdn.net/u010263423/article/details/119274544
fetch
- 原生的,基于
Promise 封装的
- 默认是
get 请求。
react native 用的挺多。
简单案例
1
2
3
4
5
6
7
8
9
10
11
12
13
14
15
16
17
18
19
| fetch("/fetchtest", {
method: "post",
body: "name=张三&age=10",
headers: {
"content-type": "application/x-www-form-urlencoded",
},
})
.then((res1) => {
console.log("res1:>>", res1);
return res1.json();
})
.then((res2) => {
console.log("res2:>>", res2);
});
|
1
2
3
4
5
6
7
| fetch("/fetchtest", {
method: "post",
body: JSON.stringify({ name: "张三" }),
headers: {
"content-type": "application/json",
},
});
|
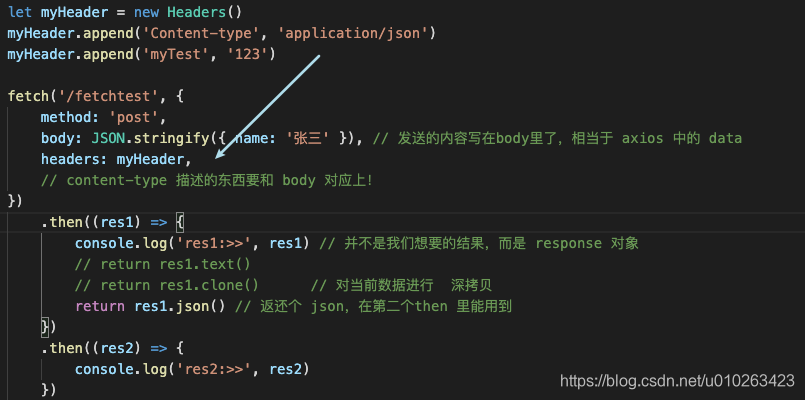
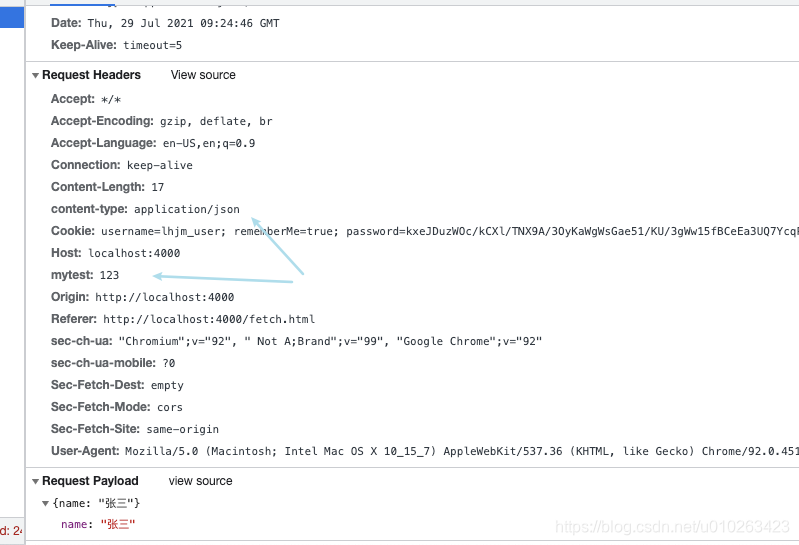
也可以实例化一个 headers 对象,然后追加,最后赋值给 headers 即可。
1
2
3
| let myHeader = new Headers();
myHeader.append("Content-type", "application/json");
myHeader.append("myTest", "123");
|
缺点
- 不能上传文件
- 兼容性,不如
xmlHttpRequest